How to Change a Socket
Planning & preparation
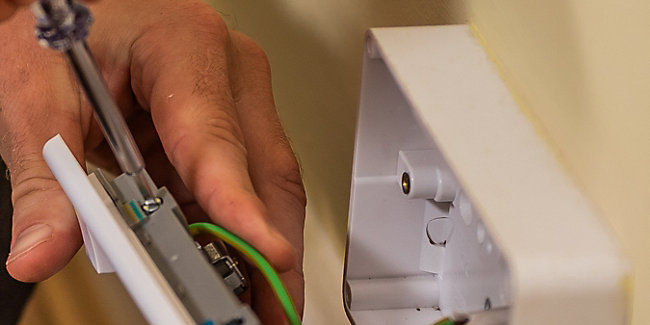
Here we will show you how to replace an old socket with a surface-mounted double electrical socket with USB ports. Bear in mind that different socket designs may have different fitting requirements, so be sure to always check the manufacturer’s instructions
Sockets are available in a range of sizes, colours and finishes, with some more modern designs also featuring USB ports and Wi-Fi extenders
Electrical installations and alterations are subject to local building and electrical regulations that you must comply with. For information on the regulations in your area
Wiring should always comply with IEE Wiring Regulations
If you have any doubts or queries, then it’s best to contact a registered electrician
Do it right
When replacing an existing socket, it is essential that the cable connections wire up to the new product in the same way as the old one. The colours of your wires will depend on how old the wiring is:
Brown (or Red if you have old wiring) – indicated by ‘L’ on your socket (Live)
Blue (or Black if you have old wiring) – indicated by ‘N’ on your socket (Neutral)
Yellow & Green striped – indicated by ‘E’ or three vertical lines on your socket (Earth)
Before using a voltage or socket tester, use it on the old socket before the power is turned off; that way you can be sure that the tester is working
If there is any sign of heat damage or fraying on the wiring, use side cutters and electrical wire strippers to trim back the damaged wire
Staying safe
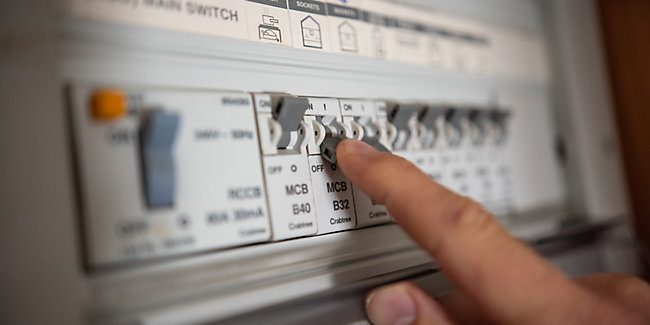
Electrical work can be dangerous, so be sure to always follow instructions and to never work on your electrics unless you are sure they have been turned off and isolated at the consumer unit (fuse box)
Purchasing a voltage or socket tester is the safest way to ensure there is no electrical current to the socket. Test the voltage tester on the old socket before the power is turned off; that way you can be sure it is working
We would recommend that all homes are fitted with a fixed RCD (Residual Current Device) as they offer the highest level of protection
Aftercare
Take care not to overload your socket as this can cause damage and overheating
Wipe with a soft dry cloth from time to time
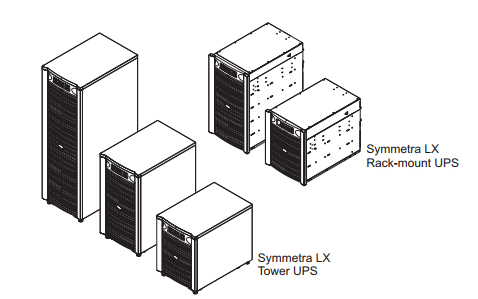
Electrical Installation Guide Tower And Rack-Mount UPS
For use with Symmetra LX UPS Models:
220/230/240 V, 4 8 kVA
220/230/240 V, 4 16 kVA
Important Safety and Installation Instructions
This manual provides instructions on the wiring and connections for the APC Symmetra LX tower and rack-mount UPS. All electrical power and power control wiring must be installed by a qualified electrician and comply with local and national regulations.
See and retain the product documentation shipped with your system for other important installation, operation, and maintenance instructions. Illustrations are representative. Your Symmetra LX configuration, including components and optional APC equipment may be different from the models shown in this guide.
Read, understand and follow ALL safety instructions contained in the Symmetra LX Safety Instructions and General Information Guide. Failure to follow safety instructions and warnings could result in equipment damage, serious injury or death
Complete Pre-installation Checklist
Before beginning the electrical installation, perform the following procedures.
1.1 Check that the circuit breaker to be used to power the UPS is in the OFF position.
1.2 Check that the input circuit breaker A on the UPS is in the OFF position.
Hardwire the UPS
Refer to local and national codes. Many locations require hardwiring by a licensed electrician.
Strain relief is required for all hardwiring.
All openings in the hardwire assembly must be covered. Failure to do so may result in personal injury or equipment damage.
Electrical alterations
All new electrical work must comply with Part P of the Building Regulations which restricts DIY electrical work on grounds of safety. However, you are still allowed to carry out some work yourself without notifying Building Control. Minor repairs and maintenance are permitted, as well as ‘like for like’ replacements, such as changing existing sockets, switches and ceiling pendants or even replacing damaged cables. As long as the job isn’t within a ‘special location’ such as a bathroom or outdoors, you’re also allowed to install additional new light fittings, switches, sockets and even add a single fused spur to an existing circuit (a ‘spur’ is a new cable and socket run as a branch from an existing socket on the ring main).
Everything else, such as installing complete new circuits or changing a fuse board for a consumer unit, is classed as ‘notifiable work’. This requires a Building Regulations application to be made in advance so the work can be inspected and checked. However, in most cases the electrician can self-certify their work as they’re normally registered with a body that gives them the necessary ‘registered installer’ status (also known as ‘competent persons’) such as the ECA (Electrical Contractors Association) or NICEIC (National Inspection Council for Electrical Installation Contracting).
A ‘non-qualified’ person can still carry out notifiable electrical work as long as Building Control are informed – but if you fail to do this and the work is found to be unsafe, it can lead to a hefty fine. Upon completion of the job, it is a legal requirement for the electrician to test the new system and hand over a signed BS 7671 electrical safety certificate. In addition, you should be sent a Building Regulations compliance certificate for all notifiable work by the operator of the registration scheme.
Re-wiring
Properties dating from the 1970s or earlier that still have their original wiring, will now be overdue for complete renewal. The first job normally involves routing all the cables and fixing the backing-boxes in place. This is known as ‘first fix’. The ‘second fix’ stage involves fitting all the covers to the switches and sockets, and installing light fittings and ceiling roses etc.
Rewiring an occupied property is more difficult than in new construction, especially in flats, where cables are often buried within inaccessible floors or ceilings. So re-wiring can cause considerable disruption and expense. Traditionally, cables running along masonry walls would be buried in channels known as ‘chases’ gouged out of the walls. In new construction cables can be run behind flat steel shields which are pinned to the bare walls and then plastered over, or can be hidden within timber studwork walls.
A beginner’s guide to wiring your home
Wiring your home could be one of the most exhausting tasks, if you have no idea about wiring, electricity and your needs. If you are planning to build your dream house very soon, or thinking of rewiring, then this article might just be the information you need to know.
Load calculation
It is better to postulate your electrical needs before you even buy wires for your home. Make a list of electrical appliances, like air conditioners, water heaters, washing machine, dryers, dishwashers, clothes iron and other appliances that you use in your household. Check out the capacity of each appliances in watts. Work out the average usage in terms of numbers of hours per day. Finally, define the number of days per year, the appliance is going to be operated. Multiply these three values and divide the total by 1,000 which would then give you the number of kilowatt hours (kWh). Keep in mind your future requirements as well. By calculating the kWh, you can choose the gauge of your wire.
Place your concealed conduit PVC pipes in position
This is the second and most important part of wiring your home. Mark the points where you want to have any power points, electrical outlets, modular boards and distribution boards. This method generally involves chiselling of walls, and placing of the conduit pipes in position.
Concealed conduit PVC pipes not only look aesthetically appealing, but also reduce the chances of getting electrocuted. Don’t forget to maintain a Single Line Diagram (SLD) of your wiring and pipes, as it would be required for any other civil or electrical work you may undertake in the future.
Colour coding of wires
This is by far one of the most important factors required for rewiring your home. Colour coding of wires help you recognise or identify the cables even if you look at them after years. Finolex Wires come in various different colours from red, green, blue, black, yellow, etc. If you have a lot of wiring going around, a different colour for different operation is the best. You can never get confused between which wire was for which appliance or socket.

electrical planning
It is hard to summon up much excitement about doing an electrical plan during a renovation, but you will be so glad if you take the time to do one properly. A room where the sockets and light switches are in the right place is so much more comfortable to live in than one where you have to grope around in the dark in order to turn on the lamps. I like one flick of a switch to do it all – or nearly all.
One of the first things to do when you start planning a room is a furniture layout – even a rough sketch will do. Once you have that and you know where, for example, the sofas will be, you can mark on where each socket should be placed. It is a myth that they do not cost much and that you should put in more than you need. Sockets are not that attractive and the chasing of the wires into walls can considerably increase the bill from your electrician.
Switches are a challenge to understand: there are 3-gang, two-way, toggle, dolly or dimmer modes. My brain starts to jam. But remain calm. Gangs indicate the number of switches on the plate and each switch controls a different circuit. So a 3-gang switch would do three circuits, which might be the ceiling spots, table lamps and wall lights. Ways indicate the number of switches controlling the lights. So if you have one switch at one end of a corridor and one at the other working one set oflights, that is a 1-gang, two-way switch. Specify the switch plates you want – I like True Edge in a brass finish. Let the electrician buy them, as it can be confusing and there’s no saving in doing it yourself.
Bedrooms are the place where you need to be methodical. You ideally want to be able to control all the lighting from at least one side of the bed, as well as at the door. Place your switches above your bedside table and a few inches away from the bed. Put lamps on 5-amp wall plugs or you will go mad hopping in and out of bed to switch them all on and off.
Think about having sockets in the floor for lamps. Make sure the socket is adequately recessed so that, when something is plugged in, the lid can go back on and remain flush to the floor – your electrician may not think of this.