Try Renting A Photo Booth

Why You Should Have a Photo Booth at Your Wedding

Photo booths are incorporated in almost all wedding receptions. They are a classic way to add style and more fun to your wedding. People of all ages enjoy taking pictures at the photo booth.

Also, while making a photo booth station, it gives you the freedom to decorate it as you like. Photo booths are a great way to have fun and capture moments that you would want to cherish forever.

There are various details that go into making the perfect photo booth; a backdrop, props, lighting, spotlights, digital cameras. While some things like spotlights and props are optional, a backdrop and a nice digital camera are required.

Some people choose to build their own photo booth stations, and some opt to hire the entire setting from a wedding photo booth company. Every photo booth company offers different types and designs, from which you can choose for your big day.

If you are new to the wedding photo booths concept, hiring them will be more favorable. Also, you can always share your ideas and take help from photo booth rentals to make your big day even more memorable.

Top Reasons Why You Should Have a Photo Booth

  1. Entertainment. Having a few activities besides dancing at your reception is a good way to make sure all your guests have fun. Sometimes people just want a break from busting a move, and the photo booth provides a nice escape. It’s also a good place for people to gather and socialize. Your guests will love it. We always have a queue to get into our booth and when guests come out they are always smiling; so much so they come back again and again!
  • It creates a great keepsake — for you and your guests. People will appreciate having a photo of themselves with their friends, their kids, or their date. But even if they don’t care about that, you will love having fun pictures of your wedding guests. If you think of it like a modern guest book, it seems silly to skip it just because it’s been done before.
  • It’s not cliche for the older set. Your bridesmaids, who spend many an hour looking at online wedding inspiration with you may think its only a trend because they have seen too much of it. But your older relatives and guests who don’t attend many weddings will likely still find the photo booth totally delightful and fun.
  • It’s suitable for all ages. You don’t have to be young to enjoy a photo and your aunt might not want to dance to Rihanna! She might want to take this ‘photo opp’ with her niece and both of them have a memory and print to share.
  • Nostalgia. Back in the good old days where phones didn’t travel with us and take pictures, we headed with our friends to a booth in the malls or party to commemorate the event. Photo booths now aday harken back to this old time feel with updated props and accessories.

Bring in the props!

Breathe some of your personality and your sweetheart’s into your wedding day with larger than life props. Maybe you have a cut-out of your alma mater’s mascot or a saying that is special to the two of you. You and your guests will have a blast trying on the different props and laugh along the way.

Help capture memories that your photographer might miss.

A photographer and his/her assistant can only be in so many places at once! Capture those precious moments at your photo booth.

It’s something fun.

Cheesing in front of a photo booth is just plain fun for both you and your guests. Laugh the night away while capturing moments you’ll cherish forever.

Theme it!

Are you having a theme on your big day? Whether you want a winter wonderland, day at the beach or even just a color we can bring the props to match your theme. 

Suitable for all ages: “I have to say I loved the photo booth and so did the kids!” writes another parent. “It was amazing, such a giggle and it was nice to have something that everyone could join in with. It’s FAB! Thanks again!”

Sufficient Photographs:

Wedding photographers may not take photos of every guest since they are usually paid for limited coverage. So, getting a photo booth from the photo booth rentals is a great way of extending your photography coverage.

It takes photos of almost every guest who come and attend the wedding so that there are sufficient photographs of everyone.

Types of Wedding Photo Booths

Open Photo Booth:

The open-air photo booth is one of the most popular types of photo booths. It is actually a booth-less photo station, where the camera is attached to a tripod or just the table. There can be a background that comes with it or just props or the camera. It enables you to create our own type of backdrop. You can use it by pressing the start button or the option, where it will take you to a countdown.

You can get the photographs either through your email address or get them printed on the spot.

Video and GIF Photo Booths:

The video booth allows you to record shorter clips in a hyper-slow manner. It creates a funny result and atmosphere in the booth, where it also remains very memorable.

The GIF booths allow you to make animated GIFs with friends and families. These GIFs can also be used to upload on your social media and other pages to remember those days that have gone by.

Green Screen PhotoBooth:

This type of photo booths makes your friends and family click incredible pictures by enabling them to choose the backdrop.

How Much Does A Loading Services Guide

Home moving guide

Once you’ve booked your removal, there are a number of things to consider in advance to ensure a trouble-free move. We have compiled the following hints and tips to help you prepare for move day

Packing & unpacking

If you have decided to pack yourself, ensure the cartons are strong enough to permit stacking without damaging the contents. Make sure cartons are only half filled with heavy items such as books, and top up with lighter items.

Self-assembly furniture

Pickfords can arrange for a joiner to dismantle your furniture, depending on each item’s age, condition and complexity.

Attics and lofts

If you have an attic or loft, make sure to clear these and place items in a convenient spot ready to be moved. This helps our move team see the entire scale of your move when they first arrive, and ensures nothing gets forgotten.

Curtains, blinds and fixtures

These should be taken down prior to the arrival of your removal crew. Please place pictures and mirrors in a neat stack, as they may have to be loaded first.

Electronic devices

TVs, hi-fis, PCs, games consoles, DVD/Blu-ray players, etc, are best moved in their original packaging. Pickfords’ specialist cartons and covers protect delicate electronics in transit.

LOADING AND UNLOADING SERVICES

Once you’ve decided on the best way to move your cargo, the next step is finding a professional team to handle the loading and unloading process. Choosing a qualified group of cargo loaders and unloaders will ensure that your cargo is handled with care, and nothing gets lost or broken along the way

Handle Any Type

Services employs only the finest cargo loading and unloading specialists with experience moving every type of cargo imaginable. We understand that different types of cargo require different approaches to loading and unloading. Our team is experienced in handling general cargo, bulk shipments, fragile shipments, and large volume shipments of any kind, over land, air, or sea. Each type of shipment has a specific plan of action and a unique set of guidelines associated with handling it, so you can rest assured that your cargo will reach its destination in perfect condition

Services strives to stay ahead of global standards, and we’re constantly updating our methods with the newest and best technologies. Using the finest equipment allows us to load and unload cargo with the highest degree of productivity, so your cargo will arrive on time and without hassle.

MOVING

fantastic place to live, either part time, like the numerous snowbirds who flock there every winter, or full time. Whether you’re setting up a winter retreat or a new full-time residence

The actual physical act of moving can be a lot of work. There’s the packing, loading, transporting, unloading, unpacking, and organizing. Regardless of whether you’re going to do some of the work yourself and hire help, hire a company to handle everything for you, or go it alone, you’ll need to start by getting everything organized

On the other hand, if you are looking to hire professionals to help with some or all of your move, start your search by looking for moving companies in your current area that offer service. After you’ve done the homework and have a list of local companies that can help you with your move, invest some additional time checking those companies out by reading online reviews from their customers.

Look for information on how well the various companies handle customer service, the move itself, and any disputes or issues that may have come up with customers in the past

Once you’ve gotten the list narrowed down to a few finalists, get estimates so that you can check out their various level of service and prices. When you’ve selected the best company for you, ask them to provide you with a bill of lading or a contract for services. Unlike an order for service (or estimate), a bill of lading is legally binding and protects you in case something goes wrong.

How much does a removalist cost?

How much does a removalist cost?

If you need to move house or a small office it’s likely that the thought of piling your belongings into boxes and carrying them to a truck will be filling you with dread. Which is why so many of us are turning to removalists to help in these situations. It’s a good idea, however, to gauge the typical prices charged by removalists for different sorts of tasks. That way, you’ll be more comfortable that whoever you hire to help you out will do a decent job for a decent price.

Should I hire a removalists?

People are increasingly hiring removalists to help them when moving house or shifting their small business. But that doesn’t mean you should necessarily do so. You should consider hiring a removalist if:

The thought of lifting heavy and awkward objects over a long period of time causes you stress

You have the means to pay someone else to do a necessary, but often difficult and tedious task

Your time could be better spent elsewhere

You have large and bulky items that would best be transported by experienced operators

You need to move complicated or easily damaged items – such as a piano

Alternatively, you might consider doing the job yourself and foregoing a removalist if:

You’ve easy access to a truck or vehicle that can accommodate the load.

You don’t mind the thought of a few hours lifting (if that’s all that’s required)

You want to invite your friends along for beer and pizza once they’ve helped you with your moving job

What are the standard inclusions for removalists?

If you’re hiring removalists to help you move to a new house or apartment, the job is likely to take at least 2-3 hours, and often a fair bit longer. Typical tasks that removalists will do for you include:

Taking your belongings to their truck or van

Ensuring your belongings are safely packed inside their vehicle, and separated by protective fabric if appropriate

Carrying boxes to the removalist vehicle

Transporting your belongings to the new destination

Unloading your furniture and boxes

Placing items in the rooms and positions you want them in in your new address

Extra tasks you can give your removalist

Removalists will typically be happy to take on additional work if you want them to – though might have to pay for it.

Some of the extra tasks you can nominate include:

Packing books into boxes

Packing clothes, kitchen items and other household goods into boxes

Transporting items to additional locations

Unloading and unpacking boxes

Arranging kitchenware and other household items in your new property

Placing protecting fabric on surfaces in your old or new properties to prevent wear and tear

Moving home

Moving home can be stressful, with buying and selling, moving schools, swapping the familiar for the unknown, leaving family and friends, maybe starting a new job … but the move itself shouldn’t be stressful at all.  By the time the moving crew arrives, all the sleepless nights will be behind you, and we plan to keep it that way. Whether you’re moving for work, family or purely for a change of scenery, we understand the challenges and emotions involved.  We have had years of experience to perfect our trade and we will make your move smooth and hassle-free

Movers offer for an intercity removal?

Expert packing: we will provide the necessary cartons and protective moving materials to ensure your effects are packed and wrapped securely for the journey ahead.

Loading: our expert line-haul drivers have years of experience in how to stack and stow your effects perfectly into our containers and trucks to make sure nothing moves in transit and minimise the risk of damage.

Moving: during the move, our team are careful and efficient, providing the most secure and convenient service available.

Unloading: at your new home our team will carefully unload everything for you and put the boxes in the appropriate rooms.

Setup: we can also provide valet unpacking services upon request.

Storage: if you need storage, short or long-term, we have secure storage facilities across

Choose Your Moving Services

Our moving experts will guide you through our flexible options for intercity moving, including services such as packing, storage and insurance, or even moving vehicles. You can move as a little or as much as you want. You will receive a written quotation tailored to your specific needs.

Book Your Move

You may choose your preferred moving dates. Our moving experts are here to help you and will create a tailored moving plan

Moving Day

When moving day arrives you can sit back and relax while our team do the hard work. Our experienced crews will ensure your effects are protected during the journey and are placed exactly where you want them in your new home.

So Many Choices To Choose Switches Installation

How to Change a Socket

Planning & preparation

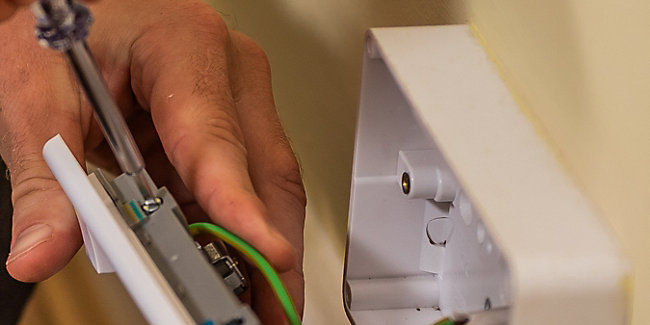
Here we will show you how to replace an old socket with a surface-mounted double electrical socket with USB ports. Bear in mind that different socket designs may have different fitting requirements, so be sure to always check the manufacturer’s instructions

Sockets are available in a range of sizes, colours and finishes, with some more modern designs also featuring USB ports and Wi-Fi extenders

Electrical installations and alterations are subject to local building and electrical regulations that you must comply with. For information on the regulations in your area

Wiring should always comply with IEE Wiring Regulations

If you have any doubts or queries, then it’s best to contact a registered electrician

Do it right

When replacing an existing socket, it is essential that the cable connections wire up to the new product in the same way as the old one. The colours of your wires will depend on how old the wiring is:

Brown (or Red if you have old wiring) – indicated by ‘L’ on your socket (Live)

Blue (or Black if you have old wiring) – indicated by ‘N’ on your socket (Neutral)

Yellow & Green striped – indicated by ‘E’ or three vertical lines on your socket (Earth)

Before using a voltage or socket tester, use it on the old socket before the power is turned off; that way you can be sure that the tester is working

If there is any sign of heat damage or fraying on the wiring, use side cutters and electrical wire strippers to trim back the damaged wire

Staying safe

Electrical work can be dangerous, so be sure to always follow instructions and to never work on your electrics unless you are sure they have been turned off and isolated at the consumer unit (fuse box)

Purchasing a voltage or socket tester is the safest way to ensure there is no electrical current to the socket. Test the voltage tester on the old socket before the power is turned off; that way you can be sure it is working

We would recommend that all homes are fitted with a fixed RCD (Residual Current Device) as they offer the highest level of protection

Aftercare

Take care not to overload your socket as this can cause damage and overheating

Wipe with a soft dry cloth from time to time

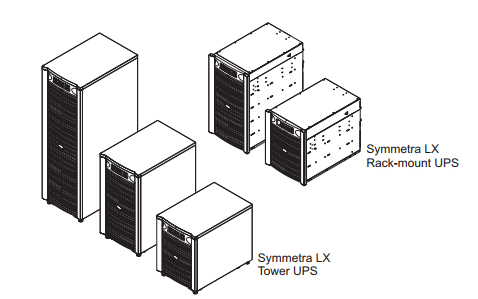
Electrical Installation Guide Tower And Rack-Mount UPS

For use with Symmetra LX UPS Models:

220/230/240 V, 4 8 kVA

220/230/240 V, 4 16 kVA

Important Safety and Installation Instructions

This manual provides instructions on the wiring and connections for the APC Symmetra LX tower and rack-mount UPS. All electrical power and power control wiring must be installed by a qualified electrician and comply with local and national regulations.

See and retain the product documentation shipped with your system for other important installation, operation, and maintenance instructions. Illustrations are representative. Your Symmetra LX configuration, including components and optional APC equipment may be different from the models shown in this guide.

Read, understand and follow ALL safety instructions contained in the Symmetra LX Safety Instructions and General Information Guide. Failure to follow safety instructions and warnings could result in equipment damage, serious injury or death

Complete Pre-installation Checklist

Before beginning the electrical installation, perform the following procedures.

1.1 Check that the circuit breaker to be used to power the UPS is in the OFF position.

1.2 Check that the input circuit breaker A on the UPS is in the OFF position.

Hardwire the UPS

Refer to local and national codes. Many locations require hardwiring by a licensed electrician.

Strain relief is required for all hardwiring.

All openings in the hardwire assembly must be covered. Failure to do so may result in personal injury or equipment damage.

Electrical alterations

All new electrical work must comply with Part P of the Building Regulations which restricts DIY electrical work on grounds of safety. However, you are still allowed to carry out some work yourself without notifying Building Control. Minor repairs and maintenance are permitted, as well as ‘like for like’ replacements, such as changing existing sockets, switches and ceiling pendants or even replacing damaged cables. As long as the job isn’t within a ‘special location’ such as a bathroom or outdoors, you’re also allowed to install additional new light fittings, switches, sockets and even add a single fused spur to an existing circuit (a ‘spur’ is a new cable and socket run as a branch from an existing socket on the ring main).

Everything else, such as installing complete new circuits or changing a fuse board for a consumer unit, is classed as ‘notifiable work’. This requires a Building Regulations application to be made in advance so the work can be inspected and checked. However, in most cases the electrician can self-certify their work as they’re normally registered with a body that gives them the necessary ‘registered installer’ status (also known as ‘competent persons’) such as the ECA (Electrical Contractors Association) or NICEIC (National Inspection Council for Electrical Installation Contracting).

A ‘non-qualified’ person can still carry out notifiable electrical work as long as Building Control are informed – but if you fail to do this and the work is found to be unsafe, it can lead to a hefty fine. Upon completion of the job, it is a legal requirement for the electrician to test the new system and hand over a signed BS 7671 electrical safety certificate. In addition, you should be sent a Building Regulations compliance certificate for all notifiable work by the operator of the registration scheme.

Re-wiring

Properties dating from the 1970s or earlier that still have their original wiring, will now be overdue for complete renewal. The first job normally involves routing all the cables and fixing the backing-boxes in place. This is known as ‘first fix’. The ‘second fix’ stage involves fitting all the covers to the switches and sockets, and installing light fittings and ceiling roses etc.

Rewiring an occupied property is more difficult than in new construction, especially in flats, where cables are often buried within inaccessible floors or ceilings. So re-wiring can cause considerable disruption and expense. Traditionally, cables running along masonry walls would be buried in channels known as ‘chases’ gouged out of the walls. In new construction cables can be run behind flat steel shields which are pinned to the bare walls and then plastered over, or can be hidden within timber studwork walls.

A beginner’s guide to wiring your home

Wiring your home could be one of the most exhausting tasks, if you have no idea about wiring, electricity and your needs. If you are planning to build your dream house very soon, or thinking of rewiring, then this article might just be the information you need to know.

Load calculation

It is better to postulate your electrical needs before you even buy wires for your home. Make a list of electrical appliances, like air conditioners, water heaters, washing machine, dryers, dishwashers, clothes iron and other appliances that you use in your household. Check out the capacity of each appliances in watts. Work out the average usage in terms of numbers of hours per day. Finally, define the number of days per year, the appliance is going to be operated. Multiply these three values and divide the total by 1,000 which would then give you the number of kilowatt hours (kWh). Keep in mind your future requirements as well. By calculating the kWh, you can choose the gauge of your wire.

Place your concealed conduit PVC pipes in position

This is the second and most important part of wiring your home. Mark the points where you want to have any power points, electrical outlets, modular boards and distribution boards. This method generally involves chiselling of walls, and placing of the conduit pipes in position.

Concealed conduit PVC pipes not only look aesthetically appealing, but also reduce the chances of getting electrocuted. Don’t forget to maintain a Single Line Diagram (SLD) of your wiring and pipes, as it would be required for any other civil or electrical work you may undertake in the future.

Colour coding of wires

This is by far one of the most important factors required for rewiring your home. Colour coding of wires help you recognise or identify the cables even if you look at them after years. Finolex Wires come in various different colours from red, green, blue, black, yellow, etc. If you have a lot of wiring going around, a different colour for different operation is the best. You can never get confused between which wire was for which appliance or socket.

electrical planning

It is hard to summon up much excitement about doing an electrical plan during a renovation, but you will be so glad if you take the time to do one properly. A room where the sockets and light switches are in the right place is so much more comfortable to live in than one where you have to grope around in the dark in order to turn on the lamps. I like one flick of a switch to do it all – or nearly all.

One of the first things to do when you start planning a room is a furniture layout – even a rough sketch will do. Once you have that and you know where, for example, the sofas will be, you can mark on where each socket should be placed. It is a myth that they do not cost much and that you should put in more than you need. Sockets are not that attractive and the chasing of the wires into walls can considerably increase the bill from your electrician.

Switches are a challenge to understand: there are 3-gang, two-way, toggle, dolly or dimmer modes. My brain starts to jam. But remain calm. Gangs indicate the number of switches on the plate and each switch controls a different circuit. So a 3-gang switch would do three circuits, which might be the ceiling spots, table lamps and wall lights. Ways indicate the number of switches controlling the lights. So if you have one switch at one end of a corridor and one at the other working one set oflights, that is a 1-gang, two-way switch. Specify the switch plates you want – I like True Edge in a brass finish. Let the electrician buy them, as it can be confusing and there’s no saving in doing it yourself.

Bedrooms are the place where you need to be methodical. You ideally want to be able to control all the lighting from at least one side of the bed, as well as at the door. Place your switches above your bedside table and a few inches away from the bed. Put lamps on 5-amp wall plugs or you will go mad hopping in and out of bed to switch them all on and off.

Think about having sockets in the floor for lamps. Make sure the socket is adequately recessed so that, when something is plugged in, the lid can go back on and remain flush to the floor – your electrician may not think of this.

Choosing The Right Immigration Lawyer

Immigration Interview Questions You Need to Know

Obtaining a Green Card is neither quick nor easy.  If you are like most people, you will be very excited when your interview notice finally arrives.  At the same time, you may feel anxious about your upcoming interview.   While not all Green Card interviews are the same, they usually follow a general format.  Being well prepared for your interview will give you peace of mind and increase the likelihood of a successful outcome.

When you receive your interview notice, it is crucial that you read it carefully as it will direct you exactly WHEN (date and time) and WHERE (location) your interview will take place. The interview notice will often include a general list of documents that might not always apply to you completely. It’s recommended to bring the original document of every copy you submitted in your application. You will be instructed to bring an interpreter if you do not speak English fluently.

Common Immigration Interview Questions in 2020

Aside from organizing your documents, knowing what sort of questions you can expect to be asked will help you prepare for your interview.  Answer all questions fully, succinctly and truthfully, but do not volunteer information unless asked.  If you’re unsure of the answer or do not understand a question, you should always say so rather than guess.

Greetings

The interview will start with the USCIS officer greeting you and introducing themselves.  You should do likewise.  They might ask, “How are you?” or something similar.  Many will make small talk, such as commenting about the weather.  Most people report that their USCIS interviewer was friendly, but there are exceptions.  The officer will explain the purpose of the interview.

The Oath

Before going to your interview, be aware that you will be asked to swear an oath. When instructed, raise your right hand and wait until instructed to say the following: “Do you swear to tell the truth, the whole truth and nothing but the truth?”  You might be asked if you understand what an oath is.  It is essential to know that lying under oath is a crime and can make you ineligible to receive a Green Card.

Personal information

You can expect questions asking basic personal information such as:

  • What is your full name?
  • When is your birthday?
  • Where were you born?
  • What is your race?
  • Are you Hispanic or Latino?
  • What is your current address?
  • What is your phone number?
  • Should you apply for a marriage-based Green Card, expect to be asked these questions about your spouse, too.

Physical information

It might seem strange to be asked questions about your physical appearance when your interviewer can easily see you.  Nonetheless, you might be asked questions such as:

  • How tall are you?
  • What color are your eyes?
  • What color is your hair?
  • What is your weight? (Don’t lie, though it might be tempting!)

Family history

Be prepared to answer questions about your family.  Should you apply for a marriage-based Green Card, there might also be questions about your spouse’s family.  Typical questions include:

  • What is your mother’s maiden name?
  • -in-law or father-in-law’s first name?
  • Is your mother or father a U.S. citizen?
  • How many children do you have?
  • Where were your children born?
  • Is your child your biological, adopted, or your spouse’s?

What is the process for immigrating to the United States?

Once you’ve determined what type of immigrant visa you’ll be applying for, you’re probably wondering what you need to do next.  Here’s a step-by-step look at what it takes to get an immigrant visa.

  • The sponsor (family member who’s a U.S. citizen/permanent resident or prospective employer) files an immigrant visa petition with U.S. Citizenship and Immigration Services.
  • If the petition is approved, it’s passed to the National Visa Center (NVC) for pre-processing. The NVC will contact you.
  • Next you need to choose an agent, the person who will receive all communication from NVC about your case. You can choose yourself, your sponsor, an attorney or a friend or family member you trust.
  • You’ll have to pay your immigrant visa application processing fee and affidavit of support fee. Note that to do this you’ll need a U.S. bank account.
  • Complete and submit your visa application form.
  • Have sponsor complete affidavit of support and gather evidence of their income (tax returns) and proof of their citizenship and your relationship.
  • Collect all documents you’ll need to support your application — you’ll submit photocopies to the NVC but will also need the originals for your interview. The specific documents you’ll need will vary by your country of origin but generally include birth and marriage certificates, court and prison records, military records, divorce decrees and passports.
  • Submit everything from steps 6 and 7 to the NVC (you have to submit it all together or your application could be delayed).
  • NVC reviews your application and all other supporting documents. If everything is completed, they will schedule an interview for you with the right U.S. Embassy or Consulate. You’ll get a letter informing you of the interview details.
  • Before the interview, you’ll need to schedule a medical examination with an embassy-approved doctor. Each embassy or consulate also has additional requirements that you’ll want to review before you go. Watch the State Department’s video on preparing for your interview.
  • Attend the interview and bring your interview appointment letter, passport, photographs, medical exam results and all your original and supporting documents required when you submitted your application.
  • You will be told whether your visa is approved or denied at the end of your interview.

What is an H-1B working visa & who is eligible?

A “specialty occupation” non-immigrant employment visa.  It helps those with bachelor’s or advanced degrees, those working for the Department of Defense, or those working as a fashion model, work in the USA for certain periods of time.

The H-1B has several levels and criteria that qualify you in various ways.  Some fall under the quota system, and others do not.  It’s very important that you and your employer work very closely together to determine the requirements, and the timing, as there are deadlines for some H-1Bs, and for others, it may be better to apply at a different time of year when it’s not competing for attention with those satisfying the deadlines.

Your H-1B visa may be for up to three years.  Any renewals generally do not extend beyond six years.  Some family members of the H-1B visa holder may seek H-4 nonimmigrant visas.

What is conditional permanent residence?

A conditional green card is valid for only 2 years, and the designation “CR1” on the physical card stands for “conditional resident.” A conditional green card holder must file Form I-751 to “remove the conditions” and obtain a permanent green card. In most cases, a conditional green card is issued to a spouse who has been married for less than 2 years at the time their green card was first approved.

Why would a green card application be denied?

A green card application may be denied by the U.S. government for several reasons, including but not limited to mistakes on the required forms, missing documents, insufficient financial resources, or failure to demonstrate eligibility

Can I work in the U.S. while waiting for my green card?

Anyone who already has a valid work visa (for example, an H-1B or L-1 visa) can usually continue working in the United States even while applying for a U.S. green card. Otherwise, green card applicants aren’t allowed to start working in the United States until they obtain a work permit by filing Form I-765.

How Does Mold Remediation Work To Eradicate Mold Growth In Your Home

Stages of Mold Remediation

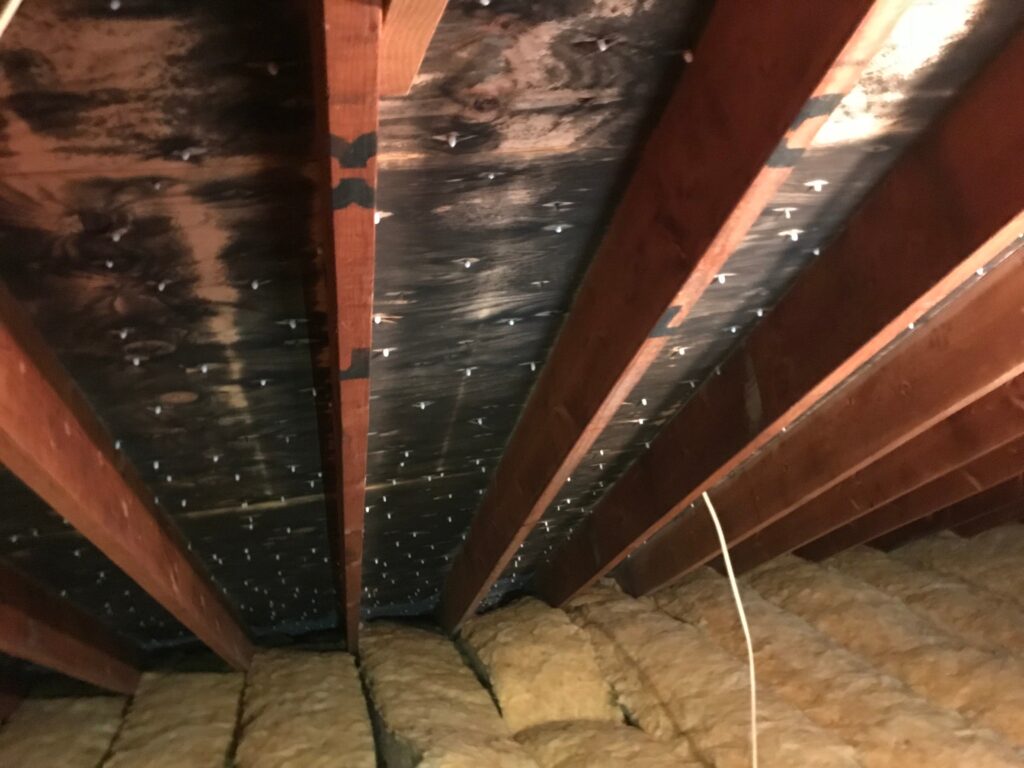
At the time, it was speculated that toxic mold in the couple’s home was a contributing factor to their deaths. Mold can cause allergic reactions and respiratory health problems such as asthma, particularly to chronic sufferers of lung disease. It is therefore important to eradicate mold as soon as you discover it in your home.

Assessment

A mold remediation specialist will visit your home or building in order to carry out the assessment. He or she might opt to bring along an Indoor Environmental Professional (IEP) who will ascertain the magnitude of the mold damage and run tests to find out the level of contamination in the building. The IEP might also gather and examine specimens from affected and unaffected parts of the structure, since mold spores and other microscopic toxins can travel easily through a building.

Address the Moisture Problem

The first goal of proper mold remediation is to fix what’s causing excess moisture in your home or building. Whether a leaky roof, poor ventilation, or bad plumbing causes your mold problem, it’s important that you find the source and fix it as soon as possible. Mold will only go away if you address the root cause. Apart from mold, you also may also face severe structural and aesthetic problems with your building if you decide to ignore your moisture problem.

Containment

Once mold is found, the specialist uses a variety of containment measures to prevent it from spreading. For example, the specialist might use negative air chambers, which will isolate the affected area, or negative air pressure, which will prevent the mold spores from spreading when the cleanup process begins. The technician will also turn off your HVAC system and any other cooling fans to prevent spores from spreading as the mold is removed.

Remediation

Moldy materials such as drywall and carpeting, which cannot be adequately cleaned, will be removed at this stage. Non-porous materials, such as tile, metals, sinks, bathtubs, and countertops will be treated with biocide to kill mold spores. The mold remediation technicians will use commercial grade antimicrobials to eliminate as much mold as possible from porous materials that cannot be removed, such as wooden wall studs.

Cleanup and Encapsulation

The technicians will use a high-efficiency particulate air (HEPA) vacuum to clean all surfaces. This removes all remaining moisture, as well as mold fragments and residues from any microbial sprays used. It also dries surfaces and prepares them for encapsulation, which is the application of a special paint or whitewash to prevent future outbreaks of mold.

How To Kill Mold

Mold Removal with Borax There are many advantages to using borax to kill mold. For starters, borax is a natural cleaning product and although it is toxic if you swallow it, borax does not emit chemicals or dangerous fumes like some other mold killers.

Mold Removal From Wood Remove Mold from Wood Guide. Wood is a hygroscopic material, which is a fancy term that means it likes to soak up and retain water (think of a sponge). mold cleanup killing Mold On Wood Remediate Mold In house killing mold With Vinegar Mold Regulations The Key to Mold Control is Moisture Control. If mold

Mold Cleanup Killing Mold On Wood Remediate Mold In House Killing Mold With Vinegar Mold Regulations The Key to Mold Control is Moisture Control. If mold is a problem in your home, you must clean up the mold and eliminate sources of moisture. Learn more about mold and moisture control. learn what you can do to prevent

The How to Kill Mold on Drywall, Wood, Carpet, Tiles and Grout page also provides instructions for removing mold from specific materials. The Mold Remediation page gives a step by step guide to remediating large mold problems. It covers protective equipment, spore containment, killing the mold

What Is Mold Spores Killing Mold On Wood Remediate Mold In House Killing Mold With Vinegar Mold Regulations The Key to Mold Control is Moisture Control. If mold is a problem in your home, you must clean up the mold and eliminate sources of moisture. Learn more about mold and moisture control. learn what you can do to prevent

Mold removal guide Methods In the direction of Suitable Mildew Remediation

If remaining unchecked, mould can trigger substantial troubles with not simply your physical fitness however your self dwelling as perfectly. Rainbow World wide mould elimination support experts are thoroughly skilled via the Institute of Inspection, Cleansing and Recovery Certificate , the marketplace’s greatest arduous classic.

In just the glassmaking worldwide this sort of are all regarded as as flaws or “issues” and had been not favored by way of glassmakers despite the fact that they do not often compromise the utility mold remediation of the bottle. Put in an air conditioner with a superior general performance particulate air filter — far better regarded as a HEPA filter — towards get rid of mildew spores towards the air.

The HEPA vacuuming and soaked wiping ought to not be construed as techniques toward take out mould improvement. Demanding surfaces such as tile can be cleaned Extremely very easily, nonetheless porous surfaces such as drywall wants alternative. Though your household suffers a drinking water injury, a mildew infestation can transpire instantly and unfold during a household inside below 72 several hours.

Mold Remediation Method

That’s right, for the cost of a book of matches, you can have a mold removal solution that is, at the very least, cheap and effective. Fire is a natural killer of mold, just like it’s a killer to any other living organism, and burning your house down is guaranteed to get rid of mold and keep it from ever coming back.

Burning down the house was chosen as the most viable method of remediation since cleaning the house would be well beyond the cost of the home and demolition would be costly and release unsafe levels of mold spores into the air where they could settle on nearby houses. That’s right, now demolition isn’t even a final solution when it comes to mold. Houses must be burned to the ground so that all of the mold dies with the house.

Presently, the lower part of the home is boarded up, and the top is encapsulated in a type of insulation to keep the mold inside. But soon it will all be ashes. At least this story isn’t too tragic for the occupants of the doomed home. No one has legally lived in the house since its last occupant died four years ago. The heir is cooperating with the township to get rid of the house

Commercial Mold Remediation

Besides causing a major business interruption, a mold problem can present a serious health risk for people exposed at your commercial property. Mold infestations can be caused by minor water intrusions, like a slow roof leak or loose plumbing fitting. Every hour spent cleaning up is an hour of lost revenue and productivity. If you suspect your property has a mold problem

Commercial Mold Remediation Presents Unique Challenges

Mold can spread quickly through a property if left untreated will begin the remediation process, working safely and effectively to manage the situation. We have the training, experience, and equipment to contain the mold infestation and remediate it to preloss condition

training and certifications.

Applied Microbial Remediation Specialist

Water Damage Restoration Technician

Applied Structural Drying Technician

Odor Control Technician

Upholstery and Fabric Cleaning Technician

The Payroll Service Outsourcing Trend

Everything You Need to Know About Payroll Deductions

Need information about the payroll deductions you see on every paycheck? Knowing what they are and why they exist is important for your understanding of your compensation. Knowing about payroll deductions lets you understand why your paycheck may not have been as much as you expected.

Payroll Deductions Are Mandatory or Voluntary

Payroll deductions are either mandatory or voluntary. Knowing the difference and why these deductions exist will explain why your salary is not the same as what you are paid. If you have additional questions after reading through this information, your Human Resources department is your best resource. They can answer your questions about your compensation, paycheck, and payroll deductions.

Mandatory Payroll Deductions

The employer is required by law to withhold payroll taxes from an employee’s gross pay prior to issuing a paycheck to comply with government regulations. Employers who fail to follow the law on mandatory deductions are open to lawsuits, fines, and even, going out of business.1

As an employee, you just need to understand what’s going on.

These are the mandatory payroll deductions for taxes:

  • Federal income tax
  • State taxes
  • Local (city, county) income tax withholding in some areas. (Other local taxes can include school district taxes, community college taxes, state disability or unemployment insurance, for example.)2

The second set of mandatory payroll deductions are for FICA (Federal Insurance Contributions Act) taxes that include:

  • Social security taxes and
  • Medicare tax withholding.

Gross pay vs. net pay

Deductions and withholding make up the difference between gross pay and net pay. Gross pay is the total amount your employee earns from their salary or hourly wage plus any bonuses, commissions, and other forms of compensation. For example, if you pay employees twice a month, a salaried employee who makes $48,000 per year will earn $2,000 in gross wages each pay period. This gross pay is where most calculations start for the IRS’s “wages subject to withholding” for employee paychecks.

Some payroll withholdings are mandatory payroll taxes; other deductions are voluntary, meaning your employee has the option to not pay them. Many voluntary deductions like health insurance or 401(k) contributions are pre-tax deductions that have the effect of reducing an employee’s taxable gross pay. Once withholdings and deductions have been made, the remaining net pay is what you pay to your employees.

Withholding vs. Deductions

Withholdings and deductions are often treated as synonyms on your paystubs. Technically, though, the term withholding refers specifically to federal or state taxes that you take out of your employees’ paychecks and send to the government. All withholdings are mandatory.

Deductions are usually voluntary, and they include opt-in retirement savings, health insurance, or donations. There are also some involuntary deductions, like when wages are garnished to pay back taxes or child support. Some deductions are pre-tax, meaning they reduce your gross wages for tax calculations. Others are taken after taxes have been withheld. Don’t worry if this is confusing — we’ll take a closer look at specific deductions below.

Withholdings and deductions have two crucial elements in common: taking out the correct amount for each employee and then sending these funds to the proper tax agency or service provider.

The Deduction Types Commonly Used in Payroll

  • Health Insurance – Medical, Dental and/or Vision health premiums are voluntary deductions that are held back from an employee’s paycheck, assuming that the employee is participating in the health insurance program. These can be spread out over the course of employment and deducted with each payroll, or deducted once a month.
  • Short-term & Long-term Disability – If you provide your employees with Short-term & Long-term disability coverage, it ensures that your employees still receive a percentage of their salary in the event of an accident that leaves them disabled, temporarily or permanently. This deduction type would be used to collect employee premiums towards this insurance.
  • Life Insurance – This deduction is used if an employer provides life insurance coverage, and your employees have signed up to receive basic term life insurance protection through the workplace. The premiums associated with the coverage are deducted from an employee’s pay, unless the employer is paying the premiums on behalf of the employee.
  • Supplemental Life Insurance – Typically, company-sponsored life insurance plans tend to be pretty basic, one-size-fits-all type of plans. As such, your employees might want to get some additional life insurance coverage. If this supplemental insurance coverage is being purchased through the workplace, your employee gets the benefit of better rates (it’s not always guaranteed though), and this deduction type would be used to collect the premiums associated with this insurance.
  • Dependent Life Insurance – This type of insurance coverage protects you in the case of a financial loss that results from the loss of a dependent spouse or child. If your employee is paying for this additional coverage, you can use this deduction type to deduct the premiums directly from an employee’s payroll.
  • Accidental Death & Dismemberment (AD&D) – Based on the type of accidents that are covered in the plan, AD&D insurance gives your employees additional protection in the case of an accidental injury or death. The premiums for this type of coverage can be based on your salary or a specific set amount.
  • 401(k) / Registered Retirement Savings Plan (RRSP) – If your employees want to put aside some money for their retirement, they can do that through a 401(k) / RRSP plan. This deduction type would be used to manage employee contributions if the amounts are being deducted directly from their payroll.
  • Profit-Sharing – This type of a plan works as an excellent incentive to motivate and retain employees because it gives them a chance to really participate in the company’s financial success. Profit-sharing plans did not always include a component of employee contribution; however, this is becoming more commonplace. Employees have certain limits to the amount they can contribute towards a profit-sharing plan.

Payroll Deduction Plan Explained

Payroll deduction plans offer employees a convenient way to automatically contribute income toward an ongoing expense or investment. For example, it is common for employees to deduct a set percentage of income and contribute it to their traditional Individual Retirement Account (IRA) or Roth IRAs. An employee may also choose to have the premiums from an insurance policy deducted from their pay, ensuring that payment is never missed.

Some payroll deduction plans may also involve the voluntary, systematic payroll deductions to purchase shares of common stock. In such cases, the employee opts into their employer’s stock purchase plan and a portion each paycheck goes to buying shares of their employer’s stock, generally at a discounted price. In an example provided by the Securities and Exchange Commission (SEC) regarding the Employee Stock payroll Deduction Plan at Domino’s Pizza, Inc., eligible employees may opt to allocated 1-15% of their paycheck to buying company stock priced at 85% of fair market value of the date the option is exercised.

Accrue.

This means to build up or accumulate. As part of a compensation package, many employers offer paid vacation, sick, and personal time. There are many ways to provide this time. Often employers choose to allow the employee to earn (or accrue) a certain amount of time per pay period. Others may give a bulk amount at one time. 

ACH (Automated Clearing House).

This is an electronic network for processing direct deposits and other payroll transactions.

Base pay rate.

The rate that has been agreed upon to be the starting point for employee earnings. This can be an hourly rate, a daily rate, a piece rate, or salary per pay.

Deductions.

Deductions are amounts taken from the employee’s paycheck (not to be confused with taxes). These can be voluntary amounts that the employee chooses, such as health insurance premiums, retirement plan contributions, and miscellaneous deductions, or involuntary deductions, such as a child support order or a tax garnishment. These items can be considered pre-tax or post-tax, depending on the actual deduction.

EFTPS.

This stands for the Electronic Federal Tax Payment System. It’s used for an employer to pay federal taxes online.

Employee’s Withholding Allowance Certificate (W-4).

Federal Form W-4 or state equivalent is where the employee states the number of withholding allowances claimed to determine income taxes to withhold from the employee’s compensation.

Exempt.

Amounts that are not considered part of the taxable compensation. These amounts would be subtracted from the gross pay (total compensation) before the calculations of each applicable tax are completed.

Example:  Employee contributions to a 401(k) plan are considered exempt from federal income tax. The contribution amount for that paycheck is subtracted out before the calculation of the Federal Income Tax (FIT) is done.

Should You Add Organic Cleaning Services To Your Carpet Cleaning Business

CARPET CLEANING GUIDE

If you’re reading this page, it must mean that you’re interested in cleaning your carpet or rug. Congrats! You’ve come to the right place. Carpet and Rug world has over 200 posts regarding Carpet and Rug Cleaning, which is why we felt like a page that gathered the most important information was necessary.

And this is in! In this page we’ll try to answer the most important questions that our readers usually have like: When to Hire a Professional, How to Hire a Carpet Cleaner (and not get ripped off), Carpet Cleaning DIY Guides, Best Carpet Cleaning Equipment or How to Clean Oriental Rugs.

We chose not to make this page too long (that way it’s faster to read and more useful to our readers), so we’ll try to answer to those questions on this page, but we’ll link to the posts in Carpet and Rug World that really explain them in detail. I would strongly encourage you to come back to this page every time you finish reading one of those post!

WHEN TO HIRE A PROFESSIONAL

This is the most important question we get regarding Carpet Cleaning. Should you clean your carpet yourself or should you hire a professional? The short answer is… Professional Cleaners will always do a better job than any DIYer. But! You can reach almost the same results as you would by hiring a professional Carpet Cleaner if you’re extremely consistent when it comes to cleaning your carpet when you have to. If you don’t clean your carpet when you have to, then only a professional carpet cleaner will be able to clean it properly.

This has a very simple explanation… when a carpet gets dirty, only the top third of the fibers are really getting dirty. If you clean your carpet soon, your equipment will be able to clean that top third of the carpet. But if you wait too much… then the dirt, soil or stain will fall to the bottom 2/3 of the carpet. And only a professional carpet cleaner will be able to clean it properly.

Carpet Care Tips

Follow these steps:

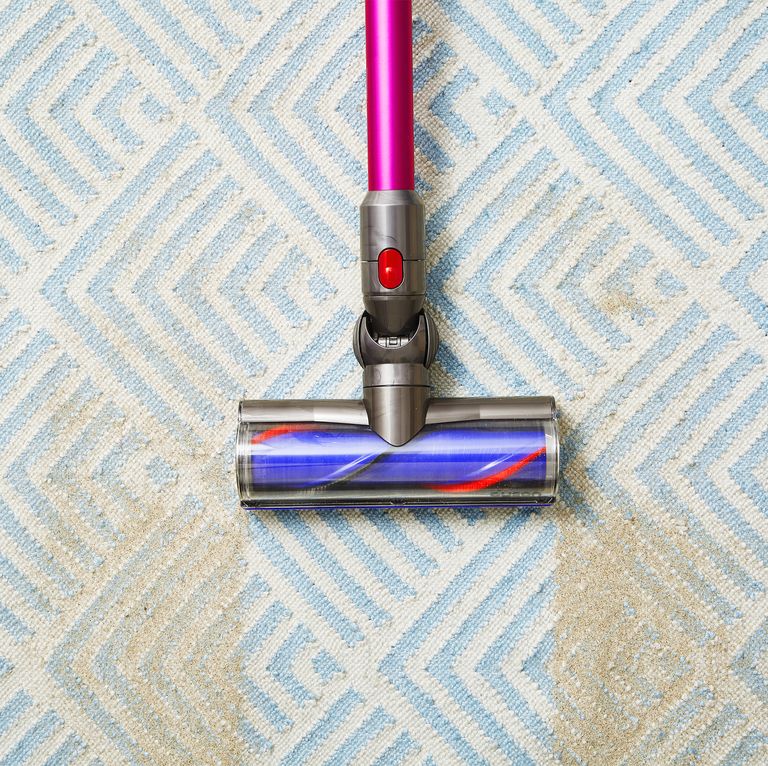
Vacuum often, such as weekly.

Start with a clean bag or filter.

Vacuum at the right speed, not too fast.

Use protective rugs in high traffic areas.

Don’t take bids over the phone.

Beware of “cheap” carpet cleaners.

You do get what you pay for, with carpet cleaning.

Clean the carpet before it becomes unhealthy.

If you have carpeting in your office or home, you’ll have to either rent a carpet steam cleaner or have a 15 x more effective professional carpet cleaner with a big performance unit such as a truck mount carpet cleaner. Carpet Care services have been providing all forms of carpet care and cleaning since 1987.  If you want to keep your carpets looking good, and smelling beautiful, follow these carpet care tips.  Accumulated dirt, grime, and pet stains will cause a nasty odour to emit from your carpet, making the whole room smell unclean.  And stains that linger around for a while will set and be more difficult to remove.

A home vacuum cleaner will not remove stains; that’s a job for a professional carpet cleaning company. A carpet cleaner is also called a carpet steam cleaner or carpet steamer. Its sometimes even confused with other types of steam cleaners, as well as floor steam cleaners

Types of Carpet Care Cleaners

There are only two main types of carpet cleaners for home use. Because these two carpet cleaners have different functions, it can be very convenient to have both. Each class has a purpose. Therefore, they can both be used to effect a carpet cleaning. You would use a compact portable carpet spot cleaner to remove stains as they happen, which can delay a full carpet cleaning to a more convenient time.

Important Carpet Care Cleaners Features

Other than hi-rise or apartment complex building, it is less common to see the dragging of a carpet cleaners hoses from the kitchen sink faucet. Then through the entire carpeted area, cleaned. Today’s carpet cleaners are more user-friendly and more comfortable to handle with on-board water tanks and tools.

How to look after your carpet A guide

A carpet can very quickly trap vast amounts of trodden – in dirt and grit from pavements containing all manner of unpleasant contaminants. It is also a store for invisible airborne pollutants such as human and animal dander, mould spores, pollen, engine fumes, dust mites and their faeces, bacteria, smoke, and other nasty chemicals.

The grit, if left in the carpet, will work its way to the bottom of the pile and slowly wear it away without anybody noticing until it is too late. The pollutants, if not removed from the carpet, will be a threat to the health and comfort of the occupants and visitors, and will begin to smell stale.

Outside the building

Because trodden in dirt starts its life outside, it does help enormously if one can brush and preferably wash down the approaches to entrance doors, and place a substantial scraper mat outside or within each doorway. The bigger the better. It needs to be shaken out daily. If dirt is allowed to build up in a mat, it will lose its ability to collect dirt.

Indoor Doormats

Trodden in wet muddy dirt is best dealt with by doormats at the inside of each entrance. You may already be using them, but what are they supposed to be doing? They should be trapping any wet dirt that escapes the outdoors mat. Synthetic mat materials such as polypropylene absorb very little moisture. I recommend the use of rubber backed cotton pile mats within each doorway. They are absorbent and thus collect wet dirt before it is trodden further into the building to rapidly soak into the carpets. It is important to wash these mats regularly.

Vacuuming

Even if you manage to reduce trodden in dirt to zero, there are still all those invisible but undesirable bits of dry debris constantly floating down onto your carpet. As they get walked on so they get pushed further into the pile. That is why it is important to vacuum main walkways regularly and frequently before the particles “take root”, even when there is no visible dirt on the surface.

How To: Carpet Cleaning

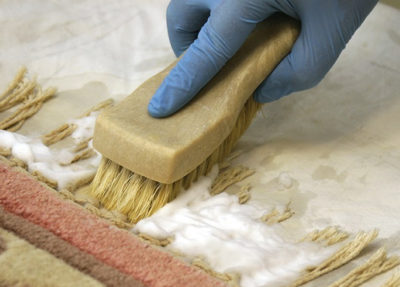
Professional Spotting Techniques

No carpet cleaner can guarantee total removal of every stain found on carpet. Fresh, relatively new stains, are easier to remove than old, set ones. Old stains like urine, cordials, and deep coloured juices dye the carpet and are impossible to remove. You can only expect to lighten the intensity of the colour.

Improper treatment of stains by the home owner usually makes stains more difficult to remove. For this reason, be honest with the customer, let them know that even professionals cannot perform “miracles”. Such honesty will help eliminate misunderstandings regarding ability and liability.

Contrary to popular belief most spotters should be used after a carpet is extracted. The reason being that 95 – 98% of the stains will be removed by extraction cleaning, particularly if it is used as a pre-spray and spotter, prior to extraction with your machine.

Spotting Procedure

Many chemical companies have made it extremely confusing and time consuming by printing elaborate stain removal charts and lists of stains with the correct procedure for each one. We believe this is the wrong way to approach stain removal as it does not encourage a learning process of stain identification and classification and most importantly it does not present a professional image. A carpet cleaner flicking through a stain removal chart in front of the customer should be avoided at all costs.

The RESEARCH PRODUCTS Method

We have developed a very simple numbering system that lets you set your own fixed procedure in dealing with stains, whether they are identified or not. By following the spotting system 1 through to 4, you are assured that the stain won’t be made more difficult to remove and that the spotter will be neutralised even if not completely rinsed from the fibres.

How to Clean Carpet the Right Way, According to a Cleaning Expert

Sad but true: Coffee stains, wine spills, and muddy footprints are simply a part of life. Sure, there are ways you can try your best to prevent the mess in the first place — asking guests to take their shoes off or buying a stain-resistant carpet, for example — but your best bet is knowing how to get rid of them before they happen.

While vacuuming on a regular basis will keep your carpet from looking dingy and dirty, tough stains are something that even the best vacuum can’t handle. Whatever the problem, there’s a specific solution or cleaning product to make your area look brand-new (or at the very least, clean) again

For most stains, follow these instructions to clean your carpet:

Take two empty spray bottles, and fill one with cold water. In the other, mix 1/4 teaspoon mild dishwashing liquid, like Dawn Ultra Dishwashing Liquid Dish Soap, and 1 cup warm water.

Spray the detergent solution onto an absorbent cloth (not the carpet — you don’t want to wet it too much), and dab (don’t rub!) it on the spot. As the stain dissolves, blot with a clean section of cloth. Keep applying and blotting until the stain is gone.

Spray another cloth with the cold water, and use it to rinse the detergent solution from the carpet, then blot again with a dry cloth.

Pile a stack of paper towels on the wet spot, and place a heavy pot on top. “Overnight, the towels will soak up any residual stain deep in the carpet. In the morning, fluff the fibers with your fingers and allow to air-dry,” Forte suggests.

If the stain remains, try a more targeted approach based on the stain you’re dealing with.

How to Refresh Carpet With Baking Soda

Looking to take a more natural approach?Lightly sprinkle baking soda to freshen up dingy carpets. After sprinkling it on trouble spots, work it into a pile with a soft brush and let it sit for 15 -30 minutes before vacuuming. Start with a new vacuum bag or clean cup and filter to make sure your vacuum’s suction is at its best to pick up the fine powder from the carpet.

How to Remove Pet Stains From Carpet

No matter how cute your four-legged friend is, the poop and urine stains they leave behind certainly aren’t. To remove pet stains, use a carpet cleaner with enzymes that also work to destroy odor-causing bacteria. After spraying the cleaner, work it in with a clean, damp cloth, rinse the area with a clean, damp cloth, and cover with the same cloth for up to 12 hours. An added bonus: The enzyme-packed cleaners,

What To Consider When Selecting A Dermatologist

When is it Time to See a Dermatologist?

Seeing a dermatologist for the first time might not be something that most people are inclined to do. You might not think you have a serious condition or something to be worried about, so you might just prefer to ignore the problem and let it heal on its own. So how exactly do you know that it is time to see a dermatologist?  If you are asking yourself any of the following questions, then it might be time to check in with a dermatologist:

What is this stubborn rash and why won’t it go away?

When over-the-counter creams or lotions won’t heal a stubborn rash, then it might be time to book an appointment. Diagnosing a rash yourself can be difficult because most rashes look the same to the untrained eye, whereas dermatologists are trained to understand the different shapes and patterns of rashes, and what those various rashes might be.

Why are my nails becoming a different color?

Nail discoloration is frequently a sign of fungal infections, although this can also be a sign of nutritional deficiencies, aging, medications, and various diseases. If this happens to you, you’ll want to visit a dermatologist to understand and treat your exact problem.

What is this new spot on my body?

New moles or changes in old moles are signs that you need a professional evaluation from a dermatologist. These can be signs of cancer, and detecting cancer as early as possible is the best way to defeat it.

Why has my skin become extra sensitive and also dry?

As you get older, the immune system of your skin gradually weakens due to environmental factors like pollens and UV rays. An annual screening with a dermatologist is the best way to understand the exact cause of your skin drying out and becoming sensitive.

Why won’t my acne go away?

Most people experience at least some form of acne, but for an unlucky few, acne can stick around longer than normal. In other cases, while your acne may go away, it may also leave you with acne scarring. Dermatologists have acne treatments, medications, and products specifically designed for any level of acne or acne scarring.

What you can expect from your first visit to the dermatologist

A dermatologist is useful for so many different reasons. If you are a teenager experiencing dreaded acne, you may visit a dermatologist to get that cleared up. If you are experiencing issues with your skin other than acne, a dermatologist will be able to address that as well.

If you’ve never been to a dermatologist, you may not know what to expect from your first appointment. But don’t worry, this article has you covered. Here’s what you can expect from your first visit to a dermatologist.

The first thing you can expect is your dermatologist to ask you questions about your medical history. It’ll be pretty similar to a visit with your primary doctor. You’ll have to tell them if you are on any medications, if you’ve had any surgeries, if you currently suffer from any medical condition, if you have any known allergies, and so on. If your doctor doesn’t know your medical history, they won’t be able to fully treat your acne or skin problems. If you are worried that you’re going to forget all of the information they will need to know, write it down before your visit and bring the paper with you.

The next thing you can expect from your dermatologist is they’ll probably look at your skin for things other than acne. Since you’ve never been to the dermatologist before, you’re probably unfamiliar with the fact that they are able to practice medical dermatology. This means they are able to check for things like cancerous moles or other suspicious marks on your body. Forms of skin cancer are very common. In fact, about 178,560 cases of melanoma will be diagnosed in the U.S. in 2018. So, don’t be surprised if they ask you to put a robe on. It’s completely normal.

If you went to the dermatologist for a specific reason like acne treatment, you can usually expect to leave the office that day with a prescription in hand. Since it will likely be a medication you’ve never used before, make sure you take the time to talk with your doctor about what it is, what it’s being used for, and how to use it properly. If you don’t fully understand how to use the medication, chances are you’re going to be using it wrong and not see the results you desire.

Finally, your dermatologist will probably want to see you back in the office again in a few months. They will likely ask you to come back for a routine checkup to see how everything is going. You can use that as an opportunity to talk to them about continuous problems or to try a completely different treatment approach.

How Do I Prepare for a Dermatologist Appointment?

1) Check with your insurance provider

Most insurance plans cover dermatology visits but keep in mind that cosmetic treatments such as CoolSculpting, Botox or other injectables, are likely not covered by insurance.

Review your health insurance policy or call your insurer before you book an appointment to understand any costs that may be associated with your visit. Insurance providers typically provide coverage for treatments for chronic skin conditions like psoriasis, acne, eczema, and cancer. Other skin conditions that are typically covered by insurance include fungal, bacterial or viral skin infections, rashes, hives, allergies, and warts.

2) Prepare your questions beforehand

Start your visit knowing exactly what you may want to ask. Make a full list of concerns, pre-existing medical conditions, any medication used, and family history to give your doctor context. Also mention any previous skin diseases you’ve experienced, including seasonal ones.

Listing your concerns before your appointment ensures that you get the most out of your dermatological visit, instead of forgetting your most urgent questions and only remembering them once you’ve stepped out of the clinic.

With extra information prepared in advance, your dermatologist will have a better understanding of your medical background, skin issues, and any treatments you’ve received, which will allow your doctor to provide a treatment plan moving forward.

3) Don’t expect quick fixes

Too many patients go into dermatology clinics thinking a quick treatment or appointment will completely transform their skin. If you’re undergoing treatments for chronic skin conditions, expect some trial and error before you get the results you actually want.

Keep in mind that different patients experience varying results. Someone with your exact skin type might get amazing results in minimal time, while you might have to wait weeks before seeing the slightest improvement. Even then, in some circumstances, the most that your dermatologist might be able to accomplish is just getting your condition under control.

During your dermatology visit, always ask what you can expect from the treatment so you can set proper expectations. Expect to book follow-up visits so your doctor can reassess your treatment plan and decide if you need to add, remove, or swap any of your existing medication or dermatological procedures.

4) Research your injectables

Cosmetic procedures require just as much research as medical procedures, if not more. The compounds in injectables might not react well with certain medications or diets, which is why it’s important to provide a full medical and personal background to your dermatologist.

Avoid the risk of experiencing side effects by properly preparing for your cosmetic treatments.

Important Dermatologist Visit Reminders

Are you going to a dermatologist appointment for the first time? Make your appointment as smooth as possible by following these guidelines:

1) Wear the Gown

Make physical exams easier by undressing and wearing the examination gown provided to you. Dermatologists ask you to wear a gown for two reasons: Without clothing, your dermatologist can accurately inspect your body.  Also, your dermatologist can inspect one body part and then another without having to fiddle with your clothing.

The next time you’re up for a dermatology visit, dress down and use the examination gown for a smoother check-up.

2) Take Note of What You’re Using

Dermatologists might be skin experts, but you can’t expect them to know every topical or oral treatment that exists. Whenever you’re consulting about a specific product, always make sure that you have a photo of the product, including the product name, its medicinal strength, and any other chemical compositions.

In dermatology, two seemingly identical creams can have strengths that differ by just 1% to 5%. This difference alone can yield entirely different results, which is why it’s crucial to take note of what product you’re using.

3) Skip the Nail Polish

Your nails can inform your dermatologist about underlying health problems. For instance, the shape of your nails can be a signal of deficiencies and other health conditions that would otherwise remain hidden, both related to dermatology and your overall health.

4) Use Your Skincare Products

Too many patients make the mistake of thinking that dermatologists want to see their “bare faces.” While it’s true that you shouldn’t go to your dermatology appointment with layers of thick makeup, this doesn’t mean you should also skip your daily skincare regimen. This is especially true if you are using prescription medicine to treat certain skin conditions. Ultimately, your dermatologist will want to assess how your skin is reacting to the medication.

On the day of your appointment, don’t neglect to apply any serums, creams, and whatever else you use on a daily basis unless specified otherwise. When in doubt, you can always call ahead of your appointment and verify if there will be tests that require you not to put anything on your face.

Great Ways To Kill Silverfish Fast

How Much Does It Cost to Get Rid of Silverfish?

Silverfish can be a real nuisance if they turn up in your home. These tiny creatures can cause a lot of damage. When you see three or four, there could be dozens more nearby. So, how do you get rid of silverfish in the house?

Professional silverfish extermination is the only way to ensure that these pests are completely eradicated. Costs vary depending on the severity of the infestation, location in your home, and the treatment option used. On average, homeowners spend between $200 and $600, with the average homeowner spending $400 on a single visit to spray the majority of the home with pyrethrin. If only a single application is needed for an attic or basement, you can expect to pay $100 for silverfish control with pesticides. If recurring treatments for your home are needed monthly or quarterly, you will pay $700 to completely eradicate a severe silverfish infestation within six months with either pesticides or DE.

Silverfish Extermination Cost by Treatment

Two primary treatment plans for exterminating silverfish include pyrethrins and diatomaceous earth. Pyrethrins are chemical pesticides, and diatomaceous earth is a natural material harvested from lake bed sediment. For safety reasons and maximum effectiveness, both substances should only be applied by professionals. The price difference between these two treatments is nominal.

Silverfish Pesticide

With very few exceptions, exterminators treat your home for silverfish with pyrethrins. Pyrethrins have been a common ingredient in insecticides since the 1950s. These pesticides are safer than others, but they are still dangerous to children and pets if directly ingested. A single pesticide application costs between $200 and $250. Silverfish reproduce quickly. They sometimes enter the home by transport in unopened food from the grocery store. It’s common to require recurring treatments. Each monthly treatment can cost $40 to $50 per application in addition to the initial application. Some exterminators only do quarterly treatments. Each quarterly treatment costs between $100 and $300 per application in addition to the initial application.

Silverfish Diatomaceous Earth

If you don’t want to spray pesticides in your home, some exterminators perform their treatments with 100% all-natural Diatomaceous Earth. As a natural pesticide, DE is nearly as effective as pyrethrins. An exterminator inspects your home, identifies the infestation source, and then sprinkles it over the entire area. DE only works if it physically touches the silverfish. That’s the primary difference between treating silverfish with pesticides and treating them with DE. Pyrethrins work even when they’re only in proximity to silverfish, but DE must make physical contact with the insect to be effective.

How to get rid of Silverfish

Silverfish may be tiny, but that doesn’t mean you should ignore their presence in your home. These small, wingless pests can damage cereals, books, clothes, wallpapers and other starchy items. Managing these pests can be challenging. But there are several methods that homeowners can use to eliminate silverfish both inside and outside the home. While pesticides are available, they aren’t usually necessary. Instead, eliminating moisture and entry points can stop this problem at its root.

How to Identify Silverfish

Silverfish are only about 1/2 inch to 3/4 inch long and, like their name suggests, are pearl gray to silver in color. They’re often confused with firebrats, which are about the same size and shape, but will be more of a dull gray to brown color.

Silverfish have long, wingless bodies and a pair of long, slender antennae. Their bodies taper, from front to back, to three, tail-like appendages. Silverfish thrive in areas with temperatures between 71 and 90 degrees F with humidity above 70%. Laundry rooms can usually supply an ideal environment. You can also find them crawling along pipes and openings along walls and floors. You might also see them in your bathroom tubs and sinks.

What Problems Can Silverfish Cause?

Silverfish are more of a nuisance than they are dangerous to people or homes. They don’t cause structural damage, but they can damage books and dry foods. They don’t spread disease. Silverfish do molt frequently though, which can trigger allergies if debris and dust are allowed to build up. But this can be prevented with regular dusting and vacuuming.

Silverfish are attracted to moisture, like that caused by leaky pipes and water fixtures. But they are also attracted to starchy food sources. These include:

Books. Book bindings often have paste, which silverfish eat. They will also eat newspapers and magazines and care little about whether the item is limited edition. Books and magazines can also offer hiding places.

Wallpaper. Wallpaper paste is also a food source for these pests.

Old photographs. Keep photos properly stored in a covered photo album to preserve your memories and keep them away from silverfish. 

Pantry items. In addition to the paste on cardboard cereal boxes, starchy items like flour and cereals are also attractive sources of food for these pests.

Dust. Dust particles contain all kinds of nutritious debris for silverfish, including dead skin cells and left over food.

How to prevent and get rid of silverfish

Silverfish are seldom more than nuisances although they may, on occasion, reach unacceptable numbers. They are capable of damage by chewing papers and manuscripts (where they often feed on protein-rich gums and binding pastes) and fine textiles and leather. They may also invade packets of dried foods that have been stored in damp cupboards.

How to get rid of silverfish

Remove their food source: you don’t want to be sharing food with pests, so seal your dried goods in airtight containers. If silverfish won’t be able to access their favored meal, it’s likely they will go elsewhere.

Get a dehumidifier: silverfish love humid environments, if you have any leaks or damp areas in your home it is time fix them and set up a dehumidifier – this will be able to reduce and remove the moisture that’s sitting the air.

Vacuum: be thorough when vacuuming your home, use all attachments to get into all crevices, especially around the skirting board. Vacuum all areas, including window and door sills because you want to be sure to suck up their eggs before they hatch!

Most domestic Silverfish nuisances can be dealt with by spraying a crawling insect insecticide aerosol based on residual synthetic pyrethroids, organophosphorus or carbamate insecticides in the areas where the insects are sighted. A particular effort should be made to treat any cracks and crevices where silverfish may rest during the day, any refuges that can be sealed off will help control efforts.

How to prevent silverfish

To ensure those pesky silverfish don’t return, it’s important to know why they were attracted to your property in the first place. To remove and prevent silverfish, use your dehumidifier to take moisture out of the air. Store your food properly in containers, remove clutter and use caulk to fill any cracks or holes in your walls. Silverfish don’t like high temperatures, so keep your house warm – this will prevent damp and keep pests out.

Silverfish: Frequently Asked Questions Can silverfish live in my carpet?

Silverfish enjoy carbohydrates, particularly starch and dextrin which can be found in books, clothing and dead skin. That said, silverfish aren’t picky, they will move on to synthetic fibres found in carpets and rugs when their preferred delicacy runs low. The answer is, yes silverfish can feed and live off your carpet but they will not always be found here because they require moisture, which is why you will normally find them around leaking taps, sinks, toilets and baths.

How do silverfish get into the home?

They will access your home through gaps and cracks in your foundations, windows and doors. Sometimes it might be the case that they have laid a nest in some cardboard or a book that you have brought into the home.

Get Rid of Silverfish

You’re probably noticing more and more of these nasty little buggers running around your home. And you want to get rid of them. Fast. and for good.

Throughout this guide, we’ll cover some basic questions regarding silverfish like:

Why you have them

What they’re eating

If they’re dangerous to humans

How you can get rid of them naturally

How to use DIY traps, pesticides, and more

How to prevent them from infesting your house in the future

What are silverfish?

Silverfish are a common household pest in the United States and are easily identified by their looks. They have a distinct silver or tan color with three bristles in the rear. They move quickly throughout the home and slither between objects. Silverfish naturally prefer darker and humid environments, though they’ve been found in varying environments with varying humidity levels.

You’ll often notice them crawling around during the night or curled up in an edge between objects during the day. Crevices, storage, and cardboard boxes are prime areas where they nest and breed, and are often ignored by humans often far too long until there’s a silverfish invasion throughout the home as they forage for food due to competition between other silverfish or species.

Silverfish anatomy

Silverfish are about 12-20mm in length and are easily noticeable due to their distinct appearance. They look exactly the same from nymph to adult- just a tinier version of themselves.

Silverfish life cycle

Silverfish can become a nuisance rapidly within their colony because they reproduce quickly. The female lays up to 20 eggs per day. Silverfish take about 3 months to reach full maturity from egg to adult. Eggs are laid by the female after mating and take 45 days on average to hatch depending on humidity and temperature.

Silverfish Control The Ultimate Guide To Get Rid Of Silverfish Guide

Info of Silverfish Control The Ultimate Guide

It was with fantastic aid we finished composing on Silverfish Control The Ultimate Guide. There was just as well considerably data to publish, that we were beginning to lose hopes on it”s completion! High quality is better than amount. It is of no use composing many webpages of nonsense for the reader.

Silverfish Control The Ultimate Guide To Get Rid Of Silverfish – Denoting Dishonest Methods Inside Marketing and advertising Integrity throughout marketing can often be borderline in between what on earth is wrong or right. You will find laws and regulations available with the marketing businesses to follow so they really will not annoyed or upset every readers. Nevertheless, exactly what is because underhanded advertising and marketing?

It was with fantastic aid we finished composing on Silverfish Control The Ultimate Guide. There was just as well considerably data to publish, that we were beginning to lose hopes on it”s completion! High quality is better than amount. It is of no use composing many webpages of nonsense for the reader. Alternatively, it is greater to compose a short

Find Auto Repair Shops To Fit Your Needs

Auto Repair Yourself – Fix Your Vehicles at Home For Less

Every time something goes wrong with your car, you have to take it in to the shop. With every repair, comes that hefty repair bill. As you look at the bill, you cannot imagine why it costs so much to fix your car. You think of how much money you could save if you could do auto repair yourself. However, like most people, you do not have a clue how to repair cars. However, you should be aware that there are many ways you can learn auto repair and can end up saving yourself quite a bit of money.

Friends and Family

If you have any friends and family that are knowledgeable about auto repairs, you should consult them and ask if they can help you learn some auto repair basics. If you have friends or family that are kind enough to help you learn how to repair your car, make sure that you give them something back for helping you. Perhaps there is something you can teach them, or maybe just take them out for a dinner.

Books

You can find tons of books dedicated to auto repair. These books will cover everything from the basics to more complex issues. You can find auto repair books at the local book store, at auto repair shops, or even at the library. If you are looking to buy a repair book, but do not want to spend too much, you should check out a used book store and see what repair books they have available.

If you choose to learn auto repair from a book, you should evaluate your learning process. Some people learn better from books than others. If you have a hard time learning from books, then this may not be the option for you. Also, it is important to know that some books are written better than others. It may be worth asking around and seeing what books are recommended for a beginner.

Internet

The Internet is a great resource to learn auto repair. You can find online repair guides to help you learn how to fix what is wrong with your car. Also, there are several discussion forums where people post tips on auto repair and where you can ask questions about your specific situation.

You can also purchase repair books online. You may find the repair books to be cheaper online than in brick and mortar stores.

Classes

Another option for learning auto repair yourself is to take a class. There are several places you can take an auto repair class. You can take a class from the local college or at a community center. These classes will often be taught in the evening or on weekends to accommodate work schedules.

Get To It

Now that you are aware of some of the ways to learn about auto repair, you should see what option will work best for you. Once you learn more about auto repair and can make repairs by yourself, you can save quite a bit of money for yourself and your family.

Easy DIY Car Repairs to Save Big

One of the monthly expenses many of us forget to include in our budgets is car repair and maintenance. Sure, we put down the price of gas, and maybe an oil change every two or three months, but we forget about most of the ongoing maintenance costs. Cars need regular maintenance over their useful lives, and most of us will pay through the nose to get it performed. But it doesn’t have to be that way. With parts bought online, some simple tools, and a little basic knowledge, many car repairs can be done without visiting a mechanic.

If you are lucky enough to have a garage or your own off-street work space, you might want to try your hand at a few DIY fixes in order to save some extra cash. Since dropping the tank to replace a fuel pump is not advisable for beginners, a cheat sheet containing a few easy DIY jobs is the best place to start. Remember, always research the task thoroughly beforehand via vehicle-specific online forums, reviewing PDF mechanic notes, and watching YouTube videos, as they are all indispensable resource. And know that since all cars are different, the ease (or lack thereof) of these projects will vary depending on what you drive.

Change Your Own Brake Pads

All you need is a wheel lug wrench, some basic wrenches, pliers, and of course a jack and set of jack stands (never get under a car unless it is on jack stands; you cannot rely on the jack as it may fail).

A set of new brake pads will set you back just $20–$40, depending on the car and pad material. Compare that to the industry average of $250 per axle, and you can see how much this DIY job will save you. The procedure is basic. Take off the wheel, remove the hardware, pull out the worn pads, push in the caliper piston, install the new pads, and reinstall the hardware. You should be able to do all four wheels in under an hour, even if this is your first time doing the job. The new pads will last between 30,000–50,000 miles, and you should check them every 10,000 miles. When the pad thickness falls below 2mm–3mm, it’s time for another replacement set.

Change the Battery

The average price of a new battery is around $80, although you can spend more or less depending on the make and model. A dealer will charge upwards of $200 to replace it.

To do the swap, you just need a basic set of wrenches. The biggest warning here, Reina says, is the order in which you remove the replace the cables. Remove the NEGATIVE (black) cable FIRST, and when you have installed the new battery, replace the NEGATIVE cable LAST. If you don’t do it this way, you could short circuit the positive (red) terminal to a grounded part of the car.

Do Your Own Oil Change

Buy a good quality oil filter and the best oil you can afford from your local supplier (it can be an auto specialist or a retail store). Other than jack stands and a jack, you’ll need an oil filter wrench and a drain pan. These only have to be purchased once and will last you decades (my father-in-law has been using the same drain pan for 20 years). You can find videos online walking you through oil changes on a variety of different vehicles.

Change Your Spark Plugs

There is an episode of the iconic TV series Frasier that shows Niles and Frasier Crane attending an automotive workshop. The very first lesson is how to change spark plugs. It’s one of the easiest home repairs you can do, although these days it is very rare you’ll even have to perform this service. On modern cars, extended-life spark plugs can maintain a precise gap for 100,000 miles. However, it is still wise to check them every 30,000-40,000 miles, just to make sure.

When the time does come to replace your spark plugs, along with your regular set of tools you will need a spark plug wrench. Again, this is a “buy once, use for a lifetime” kind of purchase, and it’s not very expensive (under $10 in most cases). (WikiHow has a great instructional piece here.) And the savings…let’s just say it’s significant. You can pay over $300 for spark plugs to be changed, and spark plugs themselves are rarely more than $30 for a set.

Replace a Headlight or Taillight

If you are a good car owner, you will perform a regular walk around of your vehicle. It’s important to do this for many reasons, but one of the biggest is to check that all the lights are working. Not only are lights essential for clear vision, and alerting drivers to your intentions, but you can also incur traffic tickets if they aren’t working. So, try and do this at least once a month (you’ll need someone to help you check the taillights).

If one (or more) isn’t working, it’s time to buy a replacement and do it yourself. With the average hourly repair rate of a garage being $100, you could easily spend $25–$50 per bulb, especially if the shop has a minimum charge.

One of the most important things to do is bring the old bulb with you to the store. You want to make sure you are getting like for like. And, when it comes time to change it out, never touch the bulb glass with your bare hands. The grease from your fingers can cause the bulb to burn out early.

Replace Your Air Filter

Richard Reina pointed out another simple fix that mechanics and dealerships will heavily mark up with labor costs and parts. And yet, it is a very quick fix (in most cases…if you happen to own a German import, you may have a few extra parts to remove to access the filter). On average, you’ll pay over $100 in labor costs, and $50 for the filter.

The typical cost of an air filter from a retail store is between $15–$20, but again, this can be higher depending on the make and model of your car. In most cases, you will simply have to open up the hood of the car, turn a few screws, open the air filter housing, swap out the old for the news, and replace the screws. It really is that simple, and you can save a ton of money doing it yourself.